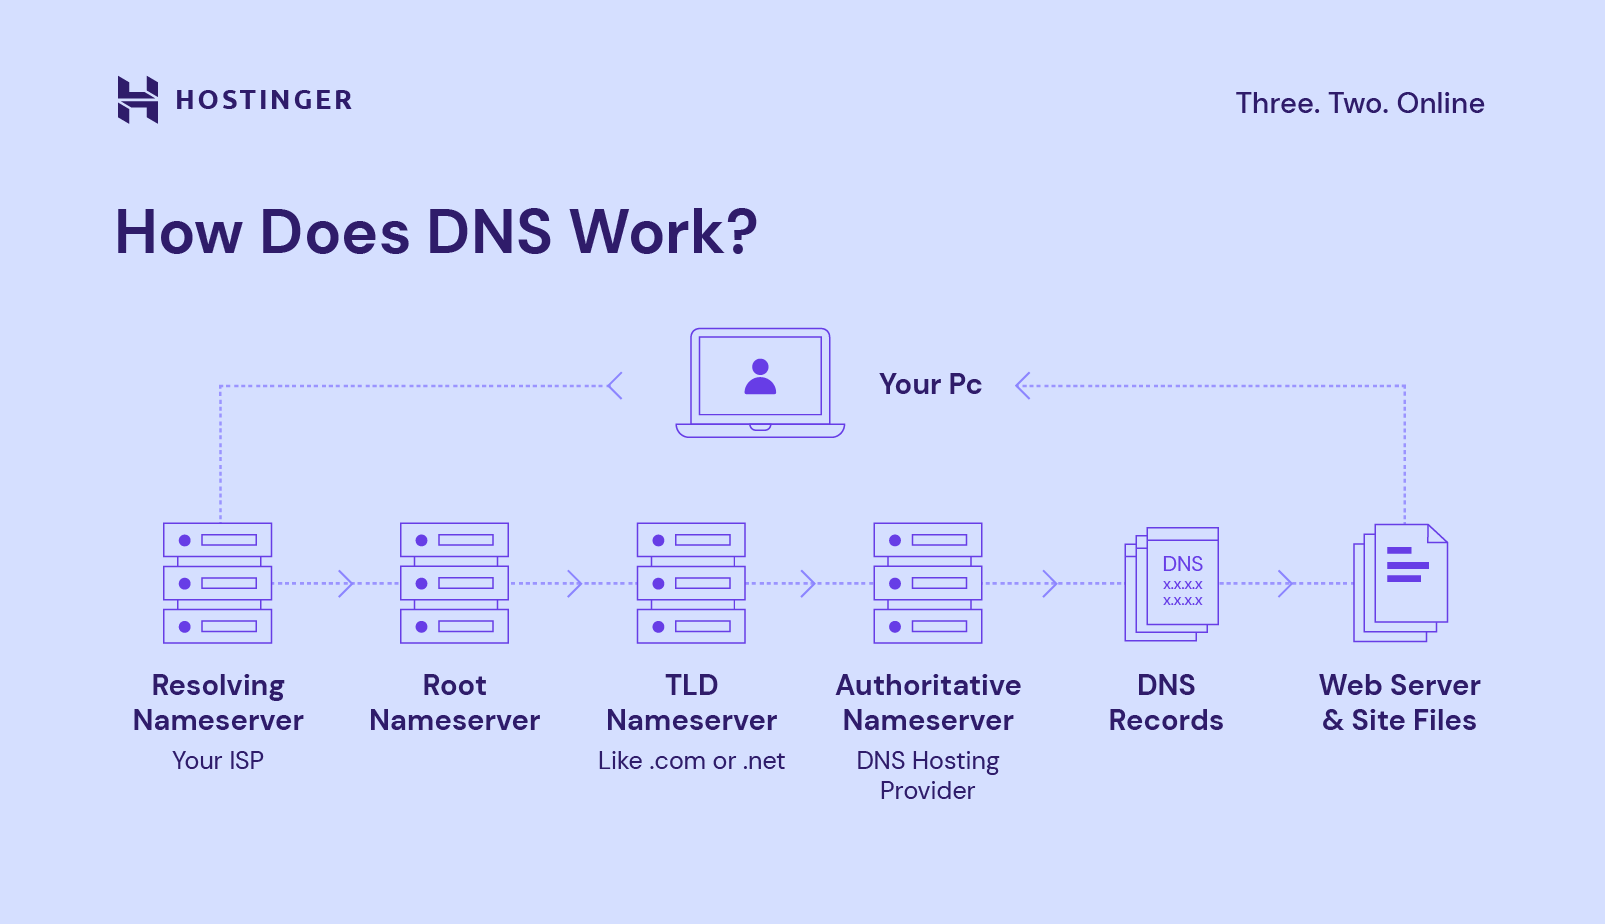
DNS is short for Domain Name System. It is a system that converts human-readable website names into computer-readable numeric IP addresses. For example, when you type in “www.example.com” into your web browser, DNS servers take that domain name and translate it into an IP address like 127.0.0.1.
DNS servers run special software that constantly updates its records of which IP address corresponds to which domain name. When you register a domain name, you must provide the DNS server with the IP address of your web server. Your DNS server then tells the rest of the world about this mapping so that when someone types in your domain name, they will be directed to your web server.
DNS servers are organized into hierarchies, with each level of the hierarchy delegating authority to lower levels. The top level of the DNS hierarchy is administered by the Internet Corporation for Assigned Names and Numbers (ICANN). ICANN delegates authority for specific domains to individual registries. For example, VeriSign is the registry for .com and .net domains.
When you register a domain name, you must provide the registrar with the name of your primary DNS server as well as the IP addresses of two secondary DNS servers. The registrar then updates the root zone file maintained by ICANN with this information. Your DNS server must then communicate with the root DNS servers periodically to retrieve updated versions of the root zone file and learn about changes to other DNS servers around the world.
DNS servers use many different types of records to store information about a domain, such as the IP address of the web server, the IP address of the mail server, and so on. The most common type of record is an A record, which maps a domain name to an IP address.
When you type in a domain name into your web browser, the browser first contacts a DNS server to resolve the domain name into an IP address. The browser then sends a request to that IP address to retrieve the webpage that you want to see. This entire process happens in a matter of milliseconds!
How Does DNS Work
A user types in a domain name like www.example.com into their browser.
The browser contacts a DNS server and requests the IP address for www.example.com.
The DNS server looks up the IP address for www.example.com in its zone file and responds back to the browser with the IP address.
The browser contacts the web server at the IP address returned by the DNS server and requests the webpage www.example.com.
The web server responds back to the browser with the requested webpage.
How to Change Dns
Dns, or the domain name system, is a critical component of the internet. It’s what allows us to type in www.google.com instead of 216.58.217.4 (google’s actual IP address). When you change your dns settings, you’re essentially telling your computer to look for websites at a different server other than the one it’s defaults to. This can be useful for a number of reasons. Maybe you want to use a dns service that offers more features, or maybe you’re trying to access a website that’s been blocked by your ISP. Regardless of the reason, changing your dns settings is a relatively simple process.
There are two ways to change your dns settings: manually or via an app. We’ll go over both methods below.
Manual Dns Settings
The first thing you need to do is find out what dns servers you want to use. A good starting point is Google Public DNS (8.8.8.8 and 8.8.4.4). Once you have the IP addresses of the dns servers you want to use, head to your network settings. In Windows, this can be found by going to Control Panel > Network and Internet > Network Connections. Right-click on the connection you want to change the dns settings for and select Properties.
In the Properties window, select Internet Protocol Version 4 (TCP/IPv4) and click the Properties button. Select Use the Following DNS Server Addresses and enter the IP addresses of the dns servers you want to use. Click OK to save your changes.
App-Based Dns Settings
If you don’t want to mess with your network settings, there are a few apps that can change your dns settings for you. For Windows, we recommend Namebench and DNSCrypt-Proxy. For Mac, we recommend DNSCloak and GasMask.
Once you’ve installed one of these apps, simply follow the instructions for changing your dns settings. The process will be different for each app, but it should be fairly straightforward.
And that’s all there is to it! Changing your dns settings is a quick and easy way to improve your internet experience.

